Post Link Sharing: Tutorial

Header Ads Widget

ad728
Showing posts with label Tutorial. Show all posts
How To Set Up Free Push Notifications For Blogger Blog (Easy Guide)

How To Set Up Free Push Notifications For Blogger Blog (Easy Guide)


Sending Newsletters via E-mails has become old. The future of the internet is more mobile than ever and only the quick adapters to more mobile-friendly ways of engaging visitors shall prevail and give online publishers a big boost ahead of their competition. In this article, I will show you how you can enable or setup browser push notifications on your Blogger website and turn your visitors into valuable customers!

What Are Push Notifications?

You might have noticed when you visit some website (for e.g. Facebook) on your browser, a popup request appears which demands your permission to display you the notifications from that website even when you are not actively using it.

push notification popup

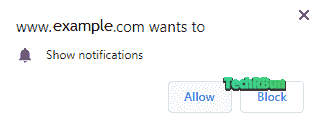
When the user clicks on Allow, no matter whether it’s a computer or a mobile phone, he/she will be able to receive updates from the website about new posts, new videos or any other update that the website would like to send him/her.

Thus, the users keep coming back to the site and the website gains more authority in the user’s mind. This not only increases the direct traffic but also the social shares and helps to build a great trustable and reliable community who become your loyal visitors.

To understand better why Push Notifications are far better and more engaging than traditional e-mail newsletters, let’s understand their differences.

Why Are Push Notifications Better Than E-mail Newsletters?

I am not saying that E-mail Newsletters are not good. What I am saying is, they are used by everyone and now it has become an old technique, but surely is effective.

But there are plenty of advantages of Push Notifications over E-mail newsletters.

Easier To Sign Up

When a visitor comes to a new website, most of the time he/she won’t be comfortable putting his/her e-mail address to a random site. Looking from the visitor’s point of view, he/she will think that the site might leak their e-mail address to third parties for money or may use it to send spam.

Apart from that, signing up for E-mail Newsletters can be technically challenging for some people too, as it requires the user to confirm the sign up by clicking on the activation link that they receive via e-mail. Now, the activation mail most of the times end up in the spam box and thus are never found by the user, preventing him/her from subscribing to your website.

Even if the visitor signs up for your newsletter, you cannot be sure if the users will actually receive your e-mails or not. This is because, most popular email providers (like Gmail, Outlook, Yahoo, etc.) tend to filter Newsletters as SPAM and thus, the user doesn’t even notice your e-mails and end up completely forgetting about your website.

Check out: How To Prevent Your Newsletters From Going In Spam

But with Push Notifications…

The process is much much simpler. All the user needs to do is, click on the Allow button when the pop up appears and that’s it.

The user is instantly subscribed to your blog with one tap!

That’s the simplicity of Push Notifications!

Higher Click-Through Rates (CTR) And Better Visibility

Be honest. How many times do you open your E-mail inbox in a day?

An average user only checks his/her e-mail once a day or even less than that.

Now say how many times do you pull down the notification panel on your phone?

A lot of times, right?

So it must be now clear to you that your subscribers are much more likely to notice the Push Notifications compared to the E-mail Newsletters.

And with an attractive Title and Featured Image, you can easily get close to 100% CTR easily.

Now I will show you how to create Push Notifications in Blogger for free, to notify your subscribers every time you upload a new post or want to send any update / send a featured article notification to your users anytime you want.

How To Setup Free Push Notification Service In Blogger?

There are a lot of services out there online which provide Push Notification Service for Blogger. But not all of them are equally reliable or good.

After a lot of research, I have found that OneSignal is the best free Push Notifications Service for Blogger.

Thus I have provided a detailed guide on how to create web push notifications in Blogger using it.

Sign Up On OneSignal

Go to https://onesignal.com/webpush and sign up using the “Get Your Free Account” button.

Type your E-mail Address, Password and the name of your Website.

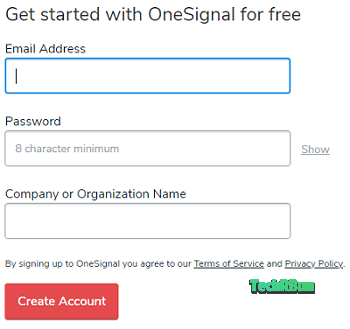
Alternatively, you can also use the social sign-in options which support sign in via Google, GitHub and Facebook.

If you signed up using your e-mail id, you will receive an e-mail from OneSignal (check your Spam box if not found in primary inbox) and you need to click on the “Click Here To Confirm Your Account” button in the e-mail.

Add Your Website

Now you will be logged in to your OneSignal account.

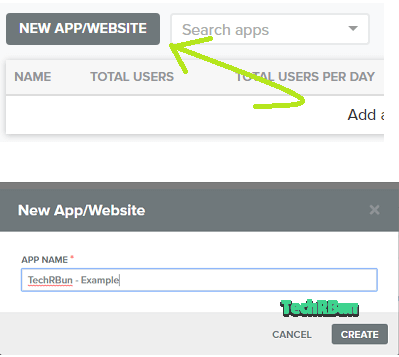
After closing the welcome message, click on the “NEW APP/WEBSITE” button.

Enter your Website’s name and click on “CREATE”.

Select Platform

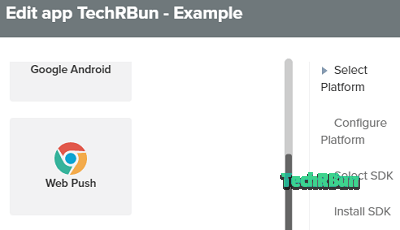
You will now be asked to select the platform.

Scroll down (if required) and select “Web Push”.

Click on “Next”.

Configure The Push Notification Service

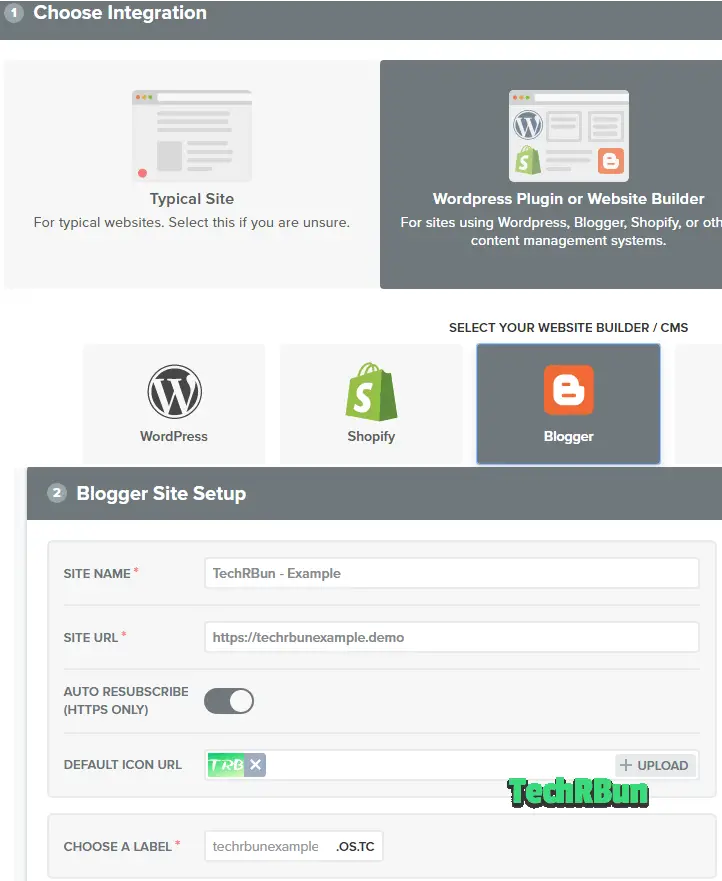
In step 1, select “WordPress Plugin Or Website Builder” as your integration.

In step 2, select “Blogger” as your CMS.

Fill out the Blogger Site Setup Form with your site’s name, URL and Icon (logo).

In the Choose A Label field, type your website’s name.

The Auto Resubscribe should be ON only if https is turned ON in your Blogger settings.

Set up Permission Prompt

Scroll down to Step 3, where you can customize how the prompt would like while asking your visitors to allow the notifications.

Click On “ADD A PROMPT”.

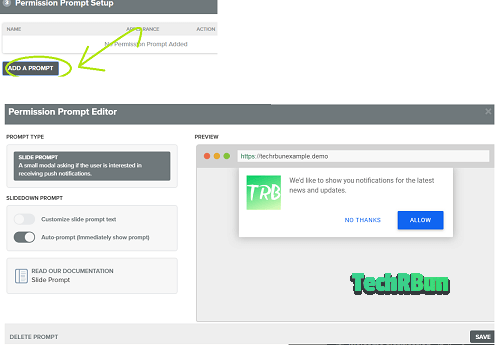
In the PROMPT TYPE, select SLIDE PROMPT.

The default settings are good enough.

But if you still want to edit the texts of the slider prompt shown at the right-hand side, enable the “Customize Slide Prompt Text” option and then you will be able to change the texts into more creative ones.

Then click on Save.

Make A Notification Bell Icon (OPTIONAL)

If you want, you can also make a bell notification icon which will stay at the corner of the screen when a visitor visits your site and will let him/her subscribe to your blog’s push notification by clicking on it.

To make a bell icon, click on “ADD A PROMPT” again.

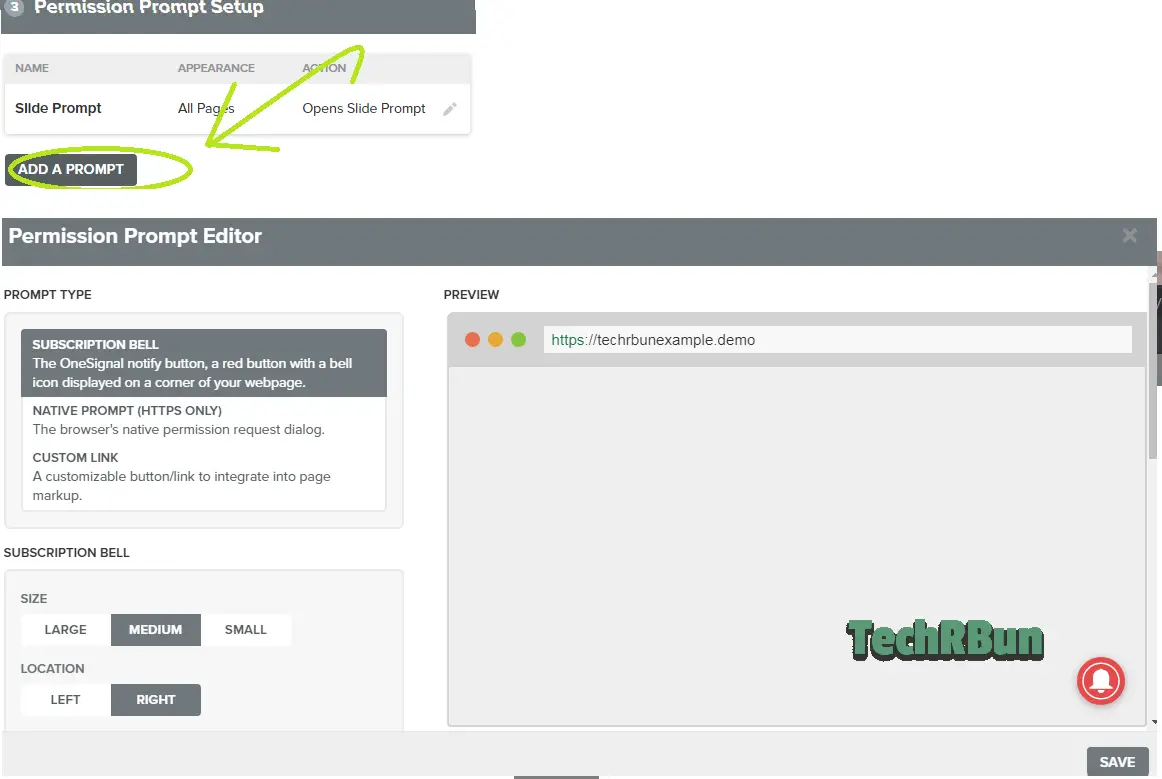
This time, the “SUBSCRIPTION BELL” option will be selected by default.

You can change the colour, size and position of the bell by scrolling down.

Then click on “SAVE”

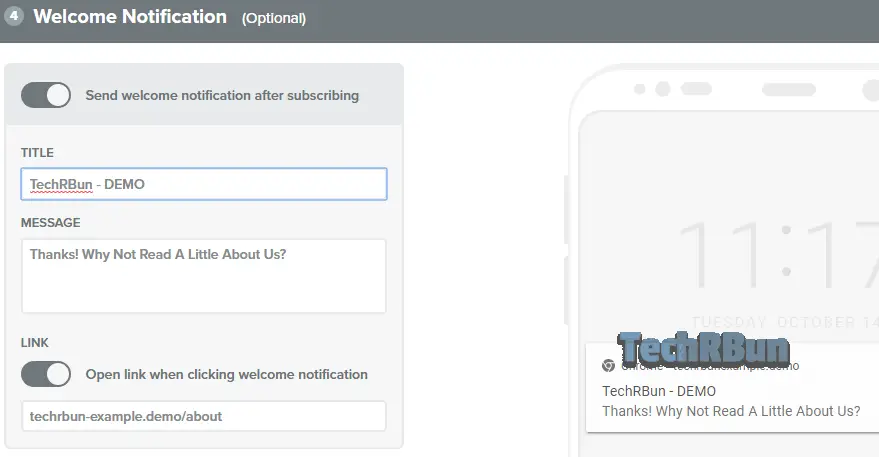
Customize Welcome Notification (OPTIONAL)

In step four, you can customize the notification that a user will receive instantly after subscribing to your blog.

You may also turn off the welcome notification.

SAVE THE CHANGES AND COPY THE CODE

You need not configure any settings other than those shown above.

Now click on “SAVE” at the end of the page.

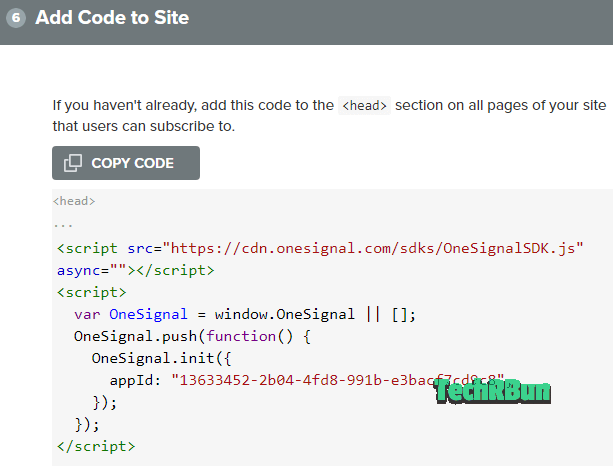
Click on “COPY CODE”.

Add The Code To Blogger

Go To BLOGGER –> THEME–> EDIT HTML (Using the 3-dot menu in the latest UI.)

In the edit HTML section, press CTRL+F and search for </head>


Just above </head>, paste the code that you just copied from OneSignal.

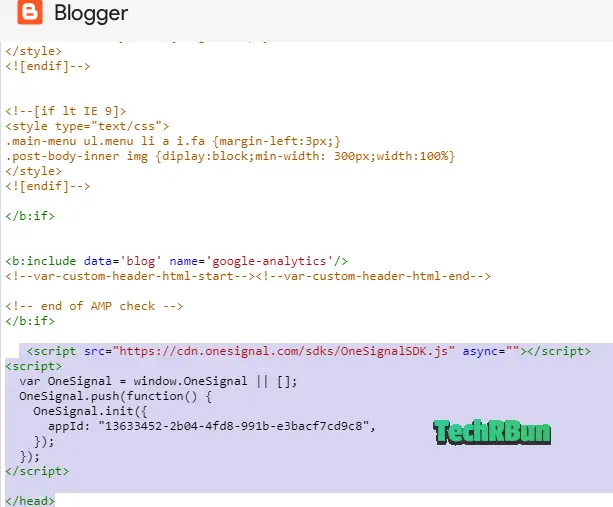
Now click on the save icon. (Located at the bottom right corner).

Then, come back to OneSignal and click on “FINISH”.

Congratulations!

You’ve successfully created Push Notification Service for your Blogger blog.

How To Send Notifications To Your Subscribers?

Go to app.onesignal.com and select your website.

Then from the header menu, select “MESSAGES”.

After the page opens, click on “NEW PUSH”.

Fill up the Title, Message and Launch URL (the URL which will open when the user clicks on the notification).

Then click on CONFIRM.

The notification will be delivered to all the users that have subscribed to your Push Notifications.

I hope this article has helped you set up free push notifications for your Blogger blog.

I would really appreciate it if you share this article with your friends who might find it interesting.

A Step-By-Step Guide to Floating Adsense Right and Left in Blogger

 In this tutorial I'm going to share how to use 250px x 236Px Adsense commercials or any different Affiliate commercials can be waft proper or left facet of your blog. Before applying this floating commercial hints please study cautiously Terms of Service of your respective Affiliates ads network. 

A Step-By-Step Guide to Floating Adsense Right and Left in Blogger


A Step-By-Step Guide to Floating Adsense Right and Left in Blogger


Step 1. Log in to your Blogger account and Go to your Blogger Dashboard

Step 2. Now Go to your Layout.


A Step-By-Step Guide to Floating Adsense Right and Left in Blogger
Step 3. Now Click on "Add a Gadget" then select "HTML/JavaScript"
A Step-By-Step Guide to Floating Adsense Right and Left in Blogger
Step 4. Now Copy the below code and paste it in "HTML/JavaScript"
<style>

#bloggersstandflotads {

height:30px;

width:auto;

background: #333333 url('..');
background-repeat:repeat-x;
text-align:left;
padding-top:4px;
}
#bloggersstandadsbase{
height:600;
margin:0auto;
width:160px;
background:#fff;
border-bottom:2px #333333 solid;
border-right:2px #333333 solid;
border-left:2px #333333 solid;
text-align:center;
padding:4px;
}
#bloggersstandadsheadline{
opacity:1.0;
height:auto;
width:auto;
position:fixed;
top:65px;
left:10px;
border-bottom:1px #005094 solid;
border-bottom:0px blue solid;
color:#333;
padding:0px;
z-index:1001;
font-size:13px;}
</style>
<script type="text/javascript">
function getValue()
{
document.getElementById("bloggersstandadsheadline").style.display = 'none';
}
</script>
<div id="bloggersstandadsheadline">
<div id="bloggersstandflotads">
<span style="color:#fff;font-size:13px;font-weight:bold;text-shadow:black 0.1em 0.1em 0.1em"></span>
<span style="color:#fff;font-size:13px;font-weight:bold;text-shadow:black 0.1em 0.1em 0.1em;float:right;padding-top:3px;padding-right:10px"><a href="https://tutbig.blogspot.com/" target="_blank" onclick="getValue()">close(x)</a></span>
</div>
<div id="bloggersstandadsbase">
<h3></h3>
<p align="left"><h3></h3></p>
Adsense Code here 

Customization  

  • Paste Your Adsense Ads Code or Any Other in "Adsense Code Here" Above code
  • To change the width of ads space replace 160px
  • To change Ads Float left or right replace left

This widget can be used with all advertising and marketing affiliate networks. Don't use this trick for Adsense,, Because it will violate AdSense phrases and condition. If you are still the usage of this widget/Gadget and you get a penalty from AdSense then I am not dependable for it. two 


I hope you enjoy this post and the photos. A Step-By-Step Guide to Floating Adsense Right and Left in Blogger

How to add a Facebook Like Box to Blogger

 Facebook Like Box is a very useful widget to exhibit traffic the authority and love of the people for his blog. Facebook affords an easy Like Box plugin that you can without problems integrate into your internet site But the default Facebook like the container is not having suitable seem at ugly all. This tutorial will show you How To Add Cute Custom Facebook Like Box the use of CSS To Blogger. Facebook Like Box is a nice way to get greater fans on Facebook. A Fan Box permits wonderful entice your Blog extra site visitors or readers to like your Facebook fan page no longer leaving the like go here. you do not want to do anything you only want to reproduction and paste the code. I'm Sure that this Cool Customize Facebook Like Box With CSS widget attracts your FB followers amplify the be counted of Likes.


How do I add a Facebook Like Box to Blogger


How To Add a Custom Facebook Like Box to Your Site

Now let's start adding it... 

Step 1. Login to Your Blogger Account. Go to your Blogger Dashboard. Click on the Layout tab from the left pane and click on Add a Gadget link. 

How do I add a Facebook Like Box to Blogger

Step 2. After click on Add a Gadget link A pop-up box will open now with many gadget lists, Choose HTML/JavaScript from the gadget options by clicking the blue plus sign for that gadget. 

How do I add a Facebook Like Box to Blogger

Step 3. Select 'HTML/Javascript' and add the one of code given below. 

Step 4. Now Click On Save 'JavaScript' You are done.

Note:- Replace pages%2FBlogspot-tutorial%2F220888831260608 With your Facebook User name

Style 1:-

How do I add a Facebook Like Box to Blogger

<div style="background: url('https://blogger.googleusercontent.com/img/b/R29vZ2xl/AVvXsEhZKeW55NcwBzIA1sXB0DRL7Cz90StCn5thg-EnVqoR4OX3WDE8EsMGlpLqiA7kUCgeONrezvRkpfhiO2UURL8NWdNcVoCnTXWI648dNXR47VpMo81vU61mskmCjB505rDljRdkVj7bOfAN/s1600/fan-01-pic.png');overflow:hidden;border-radius: 110px;.height:250px;width: 238px;border-radius: 0px 13px 0px 0px;overflow: hidden;"><div style="height: 250px; overflow: hidden;"><a href="http://24work.blogspot.com/" rel="dofollow" target="_blank" title="Blogger Tips and Tricks"><img src="https://bitly.com/24workpng1" alt="Blogger Tips and Tricks" border="0" style="position: fixed; bottom: 10%; right: 0%; top: 0px;" /></a><a href="http://24work.blogspot.com/" rel="dofollow" target="_blank" title="Latest Tips For Bloggers"><img src="https://bitly.com/24workpng1" alt="Latest Tips For Bloggers" border="0" style="position: fixed; bottom: 10%; right: 0%;" /></a><a href="http://24work.blogspot.com/" rel="dofollow" target="_blank" title="Blogger Tricks"><img src="https://bitly.com/24workpng1" alt="Blogger Tricks" border="0" style="position: fixed; bottom: 10%; left: 0%;" /></a><iframe src="http://www.facebook.com/plugins/likebox.php?href=http%3A%2F%2Fwww.facebook.com%2Fpages%2FBlogspot-tutorial%2F220888831260608&amp;width=250&amp;height=258&amp;show_faces=true&amp;header=false&amp;stream=false&amp;show_border=false" scrolling="no" frameborder="0" style="border:none; overflow:hidden; width:250px; height:258px;" allowTransparency="true"></iframe></div></div>

I hope you enjoy this post and the photos.  How do I add a Facebook Like Box to Blogger

Tips For Getting Google Adsense Account Approved Easily!

 Getting an Google Adsense account is not so easy, even it took me a long time to get it and to become a successful Blogger. If you want to be a successful blogger and want to get a Google Adsense account through your website or blog, then you need to be guided by a experienced person.


I remember that i was too much tensed when i was not able to get my Google Adsense account, but after a lots of efforts i got it. Since there was no one to guide me, it took me a long time to get it.

So today i thought to reveal the untold secrets of getting Google Adsense Account Approved. First i would like to clear that don't think so that you will get the AdSense very easily, you must know that blogging requires patience. Even it took me 15 months to get it but with the help of the tips provided below, i think you will get your Adsense Account approved easily and more quickly.

                                                                                         
These are the requirements or you can say guidelines which will help you out a lot to get your Google Adsense Account Approved quickly:
Your website must be a top-level domain because it is too difficult to get an Adsense account approved for sub-level domains.
          Example: It should be www.yoursite.com instead of www.yoursite.blogspot.com
Before you apply for Adsense, your domain must have been active for at least 6 months. These 6 months are basically to increase your website traffic and to post interesting articles.
Website Traffic is one of the most important thing. The more the traffic, the more the chances of getting Adsense approved. At least 50 unique views per day must be there, otherwise there is no use of getting it approved.
Only post Original Contents, don't copy any content (article) from any other website or source. Always try to write interesting articles, so that the user gets interested to read it. In comparison of pictures and videos, Google Adsense likes content more. At least post original 50-60 articles before applying for Google Adsense.
Private details provided during the Google Adsense registration should match to the details provided to the domain provider at the time of registration. Thus, the details provided should be accurate.
I'm damn sure that if a person will follow these guidelines, then he/she will surely get his/her Adsense Account Approved more quickly and more easily!