
Error Handling
Error handling in ASP.NET has three aspects: Tracing - tracing the program execution at page level or application level. Error handling - handling standard errors or custom errors at page level or application level. Debugging - stepping through the program, setting break points to analyze the code In this chapter, we will discuss tracing and error handling and in this chapter, we will discuss debugging. To understand the concepts, create the following sample application. It has a label control, a dropdown list, and a link. The dropdown list loads an array list of famous quotes and the selected quote is shown in the label below. It also has a hyperlink which has points to a nonexistent link. <%@ Page Language="C#" AutoEventWireup="true" CodeBehind="Default.aspx.cs" Inherits="errorhandling._Default" %>Security
Implementing security in a site has the following aspects:
-
Authentication : It is the process of ensuring the user's identity and authenticity. ASP.NET allows four types of authentications:
- Windows Authentication
- Forms Authentication
- Passport Authentication
- Custom Authentication
-
Authorization : It is the process of defining and allotting specific roles to specific users.
-
Confidentiality : It involves encrypting the channel between the client browser and the web server.
-
Integrity : It involves maintaining the integrity of data. For example, implementing digital signature.
Forms-Based Authentication
Traditionally, forms-based authentication involves editing the web.config file and adding a login page with appropriate authentication code.
The web.config file could be edited and the following codes written on it:
<configuration>

<system.web>
   <authentication mode="Forms">
      <forms loginUrl ="login.aspx"/>
   </authentication>

   <authorization>
      <deny users="?"/>
   </authorization>
</system.web>
...
...
</configuration>
The login.aspx page mentioned in the above code snippet could have the following code behind file with the usernames and passwords for authentication hard coded into it.
protected bool authenticate(String uname, String pass)
{
   if(uname == "Tom")
   {
      if(pass == "tom123")
         return true;
   }

   if(uname == "Dick")
   {
      if(pass == "dick123")
         return true;
   }

   if(uname == "Harry")
   {
      if(pass == "har123")
         return true;
   }

   return false;
}

public void OnLogin(Object src, EventArgs e)
{
   if (authenticate(txtuser.Text, txtpwd.Text))
   {
      FormsAuthentication.RedirectFromLoginPage(txtuser.Text, chkrem.Checked);
   }
   else
   {
      Response.Write("Invalid user name or password");
   }
}
Observe that the FormsAuthentication class is responsible for the process of authentication.
However, Visual Studio allows you to implement user creation, authentication, and authorization with seamless ease without writing any code, through the Web Site Administration tool. This tool allows creating users and roles.
Apart from this, ASP.NET comes with readymade login controls set, which has controls performing all the jobs for you.
Implementing Forms-Based Security
To set up forms-based authentication, you need the following:
- A database of users to support the authentication process
- A website that uses the database
- User accounts
- Roles
- Restriction of users and group activities
- A default page, to display the login status of the users and other information.
- A login page, to allow users to log in, retrieve password, or change password
To create users, take the following steps:
Step (1) : Choose Website -> ASP.NET Configuration to open the Web Application Administration Tool.
Step (2) : Click on the Security tab.
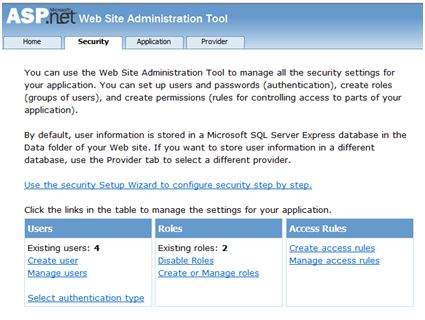
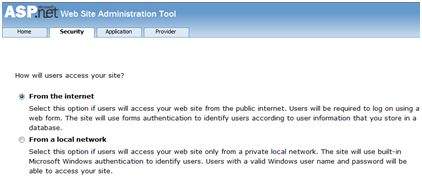
Step (3) : Select the authentication type to 'Forms based authentication' by selecting the 'From the Internet' radio button.
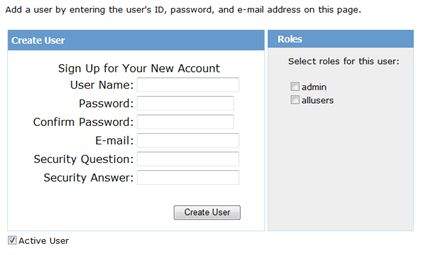
Step (4) : Click on 'Create Users' link to create some users. If you already had created roles, you could assign roles to the user, right at this stage.
Step (5) : Create a web site and add the following pages:
- Welcome.aspx
- Login.aspx
- CreateAccount.aspx
- PasswordRecovery.aspx
- ChangePassword.aspx
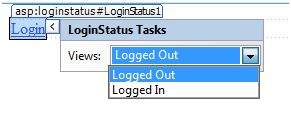
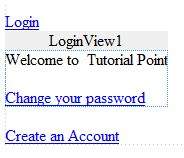
Step (6) : Place a LoginStatus control on the Welcome.aspx from the login section of the toolbox. It has two templates: LoggedIn and LoggedOut.
In LoggedOut template, there is a login link and in the LoggedIn template, there is a logout link on the control. You can change the login and logout text properties of the control from the Properties window.
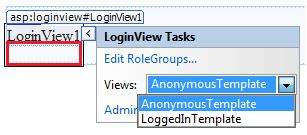
Step (7) : Place a LoginView control from the toolbox below the LoginStatus control. Here, you can put texts and other controls (hyperlinks, buttons etc.), which are displayed based on whether the user is logged in or not.
This control has two view templates: Anonymous template and LoggedIn template. Select each view and write some text for the users to be displayed for each template. The text should be placed on the area marked red.
Step (8) : The users for the application are created by the developer. You might want to allow a visitor to create a user account. For this, add a link beneath the LoginView control, which should link to the CreateAccount.aspx page.
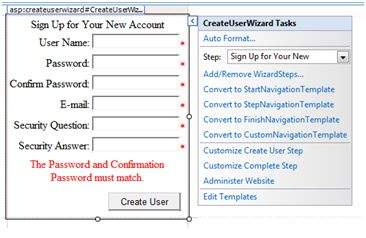
Step (9) : Place a CreateUserWizard control on the create account page. Set the ContinueDestinationPageUrl property of this control to Welcome.aspx.
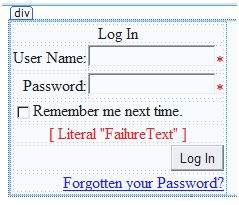
Step (10) : Create the Login page. Place a Login control on the page. The LoginStatus control automatically links to the Login.aspx. To change this default, make the following changes in the web.config file.
For example, if you want to name your log in page as signup.aspx, add the following lines to the <authentication> section of the web.config:
<configuration> <system.web> <authentication mode="Forms"> <forms loginUrl ="signup.aspx" defaultUrl = “Welcome.aspx†/> </authentication> </system.web> </configuration>
Step (11) : Users often forget passwords. The PasswordRecovery control helps the user gain access to the account. Select the Login control. Open its smart tag and click 'Convert to Template'.
Customize the UI of the control to place a hyperlink control under the login button, which should link to the PassWordRecovery.aspx.
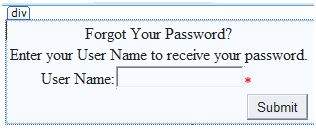
Step (12) : Place a PasswordRecovery control on the password recovery page. This control needs an email server to send the passwords to the users.
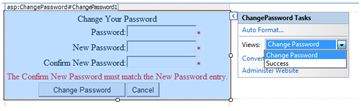
Step (13) : Create a link to the ChangePassword.aspx page in the LoggedIn template of the LoginView control in Welcome.aspx.
Step (14) : Place a ChangePassword control on the change password page. This control also has two views.
Now run the application and observe different security operations.
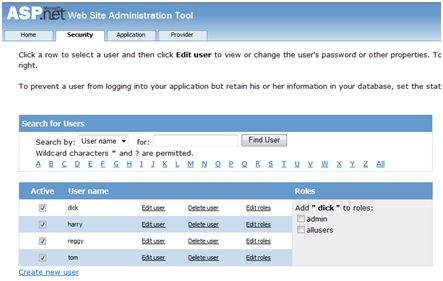
To create roles, go back to the Web Application Administration Tools and click on the Security tab. Click on 'Create Roles' and create some roles for the application.
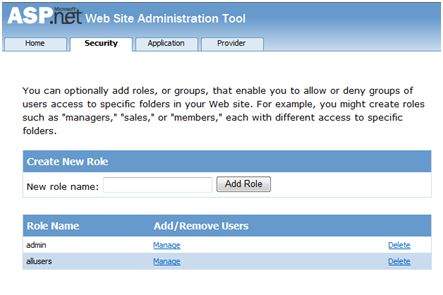
Click on the 'Manage Users' link and assign roles to the users.
IIS Authentication: SSL
The Secure Socket Layer or SSL is the protocol used to ensure a secure connection. With SSL enabled, the browser encrypts all data sent to the server and decrypts all data coming from the server. At the same time, the server encrypts and decrypts all data to and from browser.
The URL for a secure connection starts with HTTPS instead of HTTP. A small lock is displayed by a browser using a secure connection. When a browser makes an initial attempt to communicate with a server over a secure connection using SSL, the server authenticates itself by sending its digital certificate.
To use the SSL, you need to buy a digital secure certificate from a trusted Certification Authority (CA) and install it in the web server. Following are some of the trusted and reputed certification authorities:
- www.verisign.com
- www.geotrust.com
- www.thawte.com
SSL is built into all major browsers and servers. To enable SSL, you need to install the digital certificate. The strength of various digital certificates varies depending upon the length of the key generated during encryption. More the length, more secure is the certificate, hence the connection.
| Strength | Description |
|---|---|
| 40 bit | Supported by most browsers but easy to break. |
| 56 bit | Stronger than 40-bit. |
| 128 bit | Extremely difficult to break but all the browsers do not support it. |
Data Caching
What is Caching?
Caching is a technique of storing frequently used data/information in memory, so that, when the same data/information is needed next time, it could be directly retrieved from the memory instead of being generated by the application.
Caching is extremely important for performance boosting in ASP.NET, as the pages and controls are dynamically generated here. It is especially important for data related transactions, as these are expensive in terms of response time.
Caching places frequently used data in quickly accessed media such as the random access memory of the computer. The ASP.NET runtime includes a key-value map of CLR objects called cache. This resides with the application and is available via the HttpContext and System.Web.UI.Page.
In some respect, caching is similar to storing the state objects. However, the storing information in state objects is deterministic, i.e., you can count on the data being stored there, and caching of data is nondeterministic.
The data will not be available in the following cases:
- If its lifetime expires,
- If the application releases its memory,
- If caching does not take place for some reason.
You can access items in the cache using an indexer and may control the lifetime of objects in the cache and set up links between the cached objects and their physical sources.
Caching in ASP.Net
ASP.NET provides the following different types of caching:
-
Output Caching : Output cache stores a copy of the finally rendered HTML pages or part of pages sent to the client. When the next client requests for this page, instead of regenerating the page, a cached copy of the page is sent, thus saving time.
-
Data Caching : Data caching means caching data from a data source. As long as the cache is not expired, a request for the data will be fulfilled from the cache. When the cache is expired, fresh data is obtained by the data source and the cache is refilled.
-
Object Caching : Object caching is caching the objects on a page, such as data-bound controls. The cached data is stored in server memory.
-
Class Caching : Web pages or web services are compiled into a page class in the assembly, when run for the first time. Then the assembly is cached in the server. Next time when a request is made for the page or service, the cached assembly is referred to. When the source code is changed, the CLR recompiles the assembly.
-
Configuration Caching : Application wide configuration information is stored in a configuration file. Configuration caching stores the configuration information in the server memory.
In this tutorial, we will consider output caching, data caching, and object caching.
Output Caching
Rendering a page may involve some complex processes such as, database access, rendering complex controls etc. Output caching allows bypassing the round trips to server by caching data in memory. Even the whole page could be cached.
The OutputCache directive is responsible of output caching. It enables output caching and provides certain control over its behaviour.
Syntax for OutputCache directive:
<%@ OutputCache Duration="15" VaryByParam="None" %>
Put this directive under the page directive. This tells the environment to cache the page for 15 seconds. The following event handler for page load would help in testing that the page was really cached.
protected void Page_Load(object sender, EventArgs e)
{
   Thread.Sleep(10000);
   Response.Write("This page was generated and cache at:" +
   DateTime.Now.ToString());
}
The Thread.Sleep() method stops the process thread for the specified time. In this example, the thread is stopped for 10 seconds, so when the page is loaded for first time, it takes 10 seconds. However, next time you refresh the page it does not take any time, as the page is retrieved from the cache without being loaded.
The OutputCache directive has the following attributes, which helps in controlling the behaviour of the output cache:
| Attribute | Values | Description |
|---|---|---|
| DiskCacheable | true/false | Specifies that output could be written to a disk based cache. |
| NoStore | true/false | Specifies that the "no store" cache control header is sent or not. |
| CacheProfile | String name | Name of a cache profile as to be stored in web.config. |
| VaryByParam |
None * Param- name |
Semicolon delimited list of string specifies query string values in a GET request or variable in a POST request. |
| VaryByHeader |
* Header names |
Semicolon delimited list of strings specifies headers that might be submitted by a client. |
| VaryByCustom |
Browser Custom string |
Tells ASP.NET to vary the output cache by browser name and version or by a custom string. |
| Location |
Any Client Downstream Server None |
Any: page may be cached anywhere. Client: cached content remains at browser. Downstream: cached content stored in downstream and server both. Server: cached content saved only on server. None: disables caching. |
| Duration | Number | Number of seconds the page or control is cached. |
Let us add a text box and a button to the previous example and add this event handler for the button.
protected void btnmagic_Click(object sender, EventArgs e)
{
   Response.Write("<br><br>");
   Response.Write("<h2> Hello, " + this.txtname.Text + "</h2>");
}
Change the OutputCache directive:
<%@ OutputCache Duration="60" VaryByParam="txtname" %>
When the program is executed, ASP.NET caches the page on the basis of the name in the text box.
Data Caching
The main aspect of data caching is caching the data source controls. We have already discussed that the data source controls represent data in a data source, like a database or an XML file. These controls derive from the abstract class DataSourceControl and have the following inherited properties for implementing caching:
-
CacheDuration - It sets the number of seconds for which the data source will cache data.
-
CacheExpirationPolicy - It defines the cache behavior when the data in cache has expired.
-
CacheKeyDependency - It identifies a key for the controls that auto-expires the content of its cache when removed.
-
EnableCaching - It specifies whether or not to cache the data.
Example
To demonstrate data caching, create a new website and add a new web form on it. Add a SqlDataSource control with the database connection already used in the data access tutorials.
For this example, add a label to the page, which would show the response time for the page.
<asp:Label ID="lbltime" runat="server"></asp:Label>
Apart from the label, the content page is same as in the data access tutorial. Add an event handler for the page load event:
protected void Page_Load(object sender, EventArgs e)
{
   lbltime.Text = String.Format("Page posted at: {0}", DateTime.Now.ToLongTimeString());
}
The designed page should look as shown:
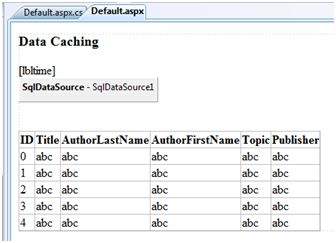
When you execute the page for the first time, nothing different happens, the label shows that, each time you refresh the page, the page is reloaded and the time shown on the label changes.
Next, set the EnableCaching attribute of the data source control to be 'true' and set the Cacheduration attribute to '60'. It will implement caching and the cache will expire every 60 seconds.
The timestamp changes with every refresh, but if you change the data in the table within these 60 seconds, it is not shown before the cache expires.
<asp:SqlDataSource ID = "SqlDataSource1" runat = "server"
   ConnectionString = "<%$ ConnectionStrings: ASPDotNetStepByStepConnectionString %>"
   ProviderName = "<%$ ConnectionStrings: ASPDotNetStepByStepConnectionString.ProviderName %>"
   SelectCommand = "SELECT * FROM [DotNetReferences]"
   EnableCaching = "true" CacheDuration = "60">
</asp:SqlDataSource>
Object Caching
Object caching provides more flexibility than other cache techniques. You can use object caching to place any object in the cache. The object can be of any type - a data type, a web control, a class, a dataset object, etc. The item is added to the cache simply by assigning a new key name, shown as follows Like:
Cache["key"] = item;
ASP.NET also provides the Insert() method for inserting an object to the cache. This method has four overloaded versions. Let us see them:
| Overload | Description |
|---|---|
| Cache.Insert((key, value); | Inserts an item into the cache with the key name and value with default priority and expiration. |
| Cache.Insert(key, value, dependencies); | Inserts an item into the cache with key, value, default priority, expiration and a CacheDependency name that links to other files or items so that when these change the cache item remains no longer valid. |
| Cache.Insert(key, value, dependencies, absoluteExpiration, slidingExpiration); | This indicates an expiration policy along with the above issues. |
| Cache.Insert(key, value, dependencies, absoluteExpiration, slidingExpiration, priority, onRemoveCallback); | This along with the parameters also allows you to set a priority for the cache item and a delegate that, points to a method to be invoked when the item is removed. |
Sliding expiration is used to remove an item from the cache when it is not used for the specified time span. The following code snippet stores an item with a sliding expiration of 10 minutes with no dependencies.
Cache.Insert("my_item", obj, null, DateTime.MaxValue, TimeSpan.FromMinutes(10));
Example
Create a page with just a button and a label. Write the following code in the page load event:
protected void Page_Load(object sender, EventArgs e)
{
   if (this.IsPostBack)
   {
      lblinfo.Text += "Page Posted Back.<br/>";
   }
   else
   {
      lblinfo.Text += "page Created.<br/>";
   }

   if (Cache["testitem"] == null)
   {
      lblinfo.Text += "Creating test item.<br/>";
      DateTime testItem = DateTime.Now;
      lblinfo.Text += "Storing test item in cache ";
      lblinfo.Text += "for 30 seconds.<br/>";
      Cache.Insert("testitem", testItem, null,
      DateTime.Now.AddSeconds(30), TimeSpan.Zero);
   }
   else
   {
      lblinfo.Text += "Retrieving test item.<br/>";
      DateTime testItem = (DateTime)Cache["testitem"];
      lblinfo.Text += "Test item is: " + testItem.ToString();
      lblinfo.Text += "<br/>";
   }

   lblinfo.Text += "<br/>";
}
When the page is loaded for the first time, it says:
Page Created.
Creating test item.
Storing test item in cache for 30 seconds.
If you click on the button again within 30 seconds, the page is posted back but the label control gets its information from the cache as shown:
Page Posted Back.
Retrieving test item.
Test item is: 14-07-2010 01:25:04
Web Services
A web service is a web-based functionality accessed using the protocols of the web to be used by the web applications. There are three aspects of web service development:
- Creating the web service
- Creating a proxy
- Consuming the web service
Creating a Web Service
A web service is a web application which is basically a class consisting of methods that could be used by other applications. It also follows a code-behind architecture such as the ASP.NET web pages, although it does not have a user interface.
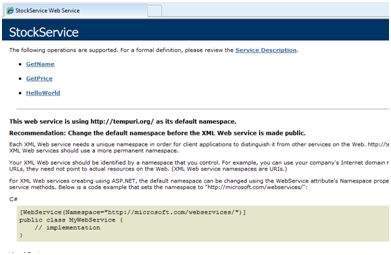
To understand the concept let us create a web service to provide stock price information. The clients can query about the name and price of a stock based on the stock symbol. To keep this example simple, the values are hardcoded in a two-dimensional array. This web service has three methods:
- A default HelloWorld method
- A GetName Method
- A GetPrice Method
Take the following steps to create the web service:
Step (1) : Select File -> New -> Web Site in Visual Studio, and then select ASP.NET Web Service.
Step (2) : A web service file called Service.asmx and its code behind file, Service.cs is created in the App_Code directory of the project.
Step (3) : Change the names of the files to StockService.asmx and StockService.cs.
Step (4) : The .asmx file has simply a WebService directive on it:
<%@ WebService Language="C#" CodeBehind="~/App_Code/StockService.cs" Class="StockService" %>
Step (5) : Open the StockService.cs file, the code generated in it is the basic Hello World service. The default web service code behind file looks like the following:
using System;
using System.Collections;
using System.ComponentModel;
using System.Data;
using System.Linq;

using System.Web;
using System.Web.Services;
using System.Web.Services.Protocols;

using System.Xml.Linq;

namespace StockService
{
   // <summary>
   // Summary description for Service1
   // <summary>

   [WebService(Namespace = "http://tempuri.org/")]
   [WebServiceBinding(ConformsTo = WsiProfiles.BasicProfile1_1)]
   [ToolboxItem(false)]

   // To allow this Web Service to be called from script,
   // using ASP.NET AJAX, uncomment the following line.
   // [System.Web.Script.Services.ScriptService]

   public class Service1 : System.Web.Services.WebService
   {
      [WebMethod]

      public string HelloWorld()
      {
         return "Hello World";
      }
   }
}
Step (6) : Change the code behind file to add the two dimensional array of strings for stock symbol, name and price and two web methods for getting the stock information.
using System;
using System.Linq;

using System.Web;
using System.Web.Services;
using System.Web.Services.Protocols;

using System.Xml.Linq;

[WebService(Namespace = "http://tempuri.org/")]
[WebServiceBinding(ConformsTo = WsiProfiles.BasicProfile1_1)]

// To allow this Web Service to be called from script,
// using ASP.NET AJAX, uncomment the following line.
// [System.Web.Script.Services.ScriptService]

public class StockService : System.Web.Services.WebService
{
   public StockService () {
      //Uncomment the following if using designed components
      //InitializeComponent();
   }

   string[,] stocks =
   {
      {"RELIND", "Reliance Industries", "1060.15"},
      {"ICICI", "ICICI Bank", "911.55"},
      {"JSW", "JSW Steel", "1201.25"},
      {"WIPRO", "Wipro Limited", "1194.65"},
      {"SATYAM", "Satyam Computers", "91.10"}
   };

   [WebMethod]
   public string HelloWorld() {
      return "Hello World";
   }

   [WebMethod]
   public double GetPrice(string symbol)
   {
      //it takes the symbol as parameter and returns price
      for (int i = 0; i < stocks.GetLength(0); i++)
      {
         if (String.Compare(symbol, stocks[i, 0], true) == 0)
         return Convert.ToDouble(stocks[i, 2]);
      }

      return 0;
   }

   [WebMethod]
   public string GetName(string symbol)
   {
      // It takes the symbol as parameter and
      // returns name of the stock
      for (int i = 0; i < stocks.GetLength(0); i++)
      {
         if (String.Compare(symbol, stocks[i, 0], true) == 0)
         return stocks[i, 1];
      }

      return "Stock Not Found";
   }
}
Step (7) : Running the web service application gives a web service test page, which allows testing the service methods.
Step (8) : Click on a method name, and check whether it runs properly.
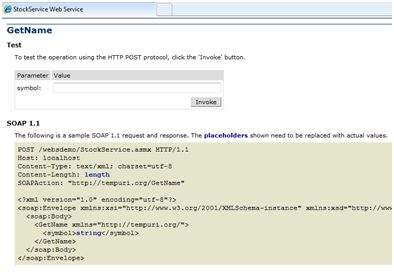
Step (9) : For testing the GetName method, provide one of the stock symbols, which are hard coded, it returns the name of the stock

Consuming the Web Service
For using the web service, create a web site under the same solution. This could be done by right clicking on the Solution name in the Solution Explorer. The web page calling the web service should have a label control to display the returned results and two button controls one for post back and another for calling the service.
The content file for the web application is as follows:
<%@ Page Language="C#" AutoEventWireup="true" CodeBehind="Default.aspx.cs" Inherits="wsclient._Default" %>

<!DOCTYPE html PUBLIC "-//W3C//DTD XHTML 1.0 Transitional//EN" "http://www.w3.org/TR/xhtml1/DTD/xhtml1-transitional.dtd">

<html xmlns="http://www.w3.org/1999/xhtml" >

   <head runat="server">
      <title>
         Untitled Page
      </title>
   </head>

   <body>

      <form id="form1" runat="server">
         <div>

            <h3>Using the Stock Service</h3>

            <br /> <br />

            <asp:Label ID="lblmessage" runat="server"></asp:Label>

            <br /> <br />

            <asp:Button ID="btnpostback" runat="server" onclick="Button1_Click" Text="Post Back" style="width:132px" />

            <asp:Button ID="btnservice" runat="server" onclick="btnservice_Click"  Text="Get Stock" style="width:99px" />

         </div>
      </form>

   </body>
</html>
The code behind file for the web application is as follows:
using System;
using System.Collections;
using System.Configuration;
using System.Data;
using System.Linq;

using System.Web;
using System.Web.Security;
using System.Web.UI;
using System.Web.UI.HtmlControls;
using System.Web.UI.WebControls;
using System.Web.UI.WebControls.WebParts;

using System.Xml.Linq;

//this is the proxy
using localhost;

namespace wsclient
{
   public partial class _Default : System.Web.UI.Page
   {
      protected void Page_Load(object sender, EventArgs e)
      {
         if (!IsPostBack)
         {
            lblmessage.Text = "First Loading Time: " +  DateTime.Now.ToLongTimeString
         }
         else
         {
            lblmessage.Text = "PostBack at: " + DateTime.Now.ToLongTimeString();
         }
      }

      protected void btnservice_Click(object sender, EventArgs e)
      {
         StockService proxy = new StockService();
         lblmessage.Text = String.Format("Current SATYAM Price:{0}",
         proxy.GetPrice("SATYAM").ToString());
      }
   }
}
Creating the Proxy
A proxy is a stand-in for the web service codes. Before using the web service, a proxy must be created. The proxy is registered with the client application. Then the client application makes the calls to the web service as it were using a local method.
The proxy takes the calls, wraps it in proper format and sends it as a SOAP request to the server. SOAP stands for Simple Object Access Protocol. This protocol is used for exchanging web service data.
When the server returns the SOAP package to the client, the proxy decodes everything and presents it to the client application.
Before calling the web service using the btnservice_Click, a web reference should be added to the application. This creates a proxy class transparently, which is used by the btnservice_Click event.
protected void btnservice_Click(object sender, EventArgs e)
{
   StockService proxy = new StockService();
   lblmessage.Text = String.Format("Current SATYAM Price: {0}",
   proxy.GetPrice("SATYAM").ToString());
}
Take the following steps for creating the proxy:
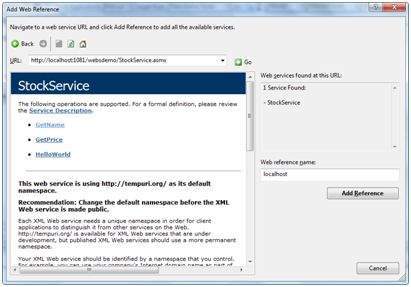
Step (1) : Right click on the web application entry in the Solution Explorer and click on 'Add Web Reference'.
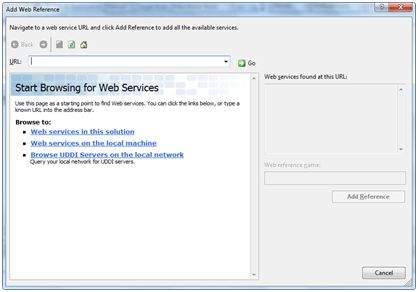
Step (2) : Select 'Web Services in this solution'. It returns the StockService reference.
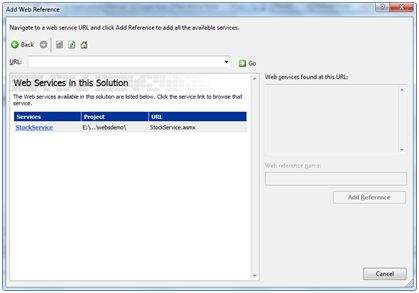
Step (3) : Clicking on the service opens the test web page. By default the proxy created is called 'localhost', you can rename it. Click on 'Add Reference' to add the proxy to the client application.
Include the proxy in the code behind file by adding:
using localhost;
Multi Threading
MultiView and View controls allow you to divide the content of a page into different groups, displaying only one group at a time. Each View control manages one group of content and all the View controls are held together in a MultiView control.
The MultiView control is responsible for displaying one View control at a time. The View displayed is called the active view.
The syntax of MultiView control is:
<asp:MultView ID= "MultiView1" runat= "server">
</asp:MultiView>
The syntax of View control is:
<asp:View ID= "View1" runat= "server">
</asp:View>
However, the View control cannot exist on its own. It would render error if you try to use it stand-alone. It is always used with a Multiview control as:
<asp:MultView ID= "MultiView1" runat= "server">
   <asp:View ID= "View1" runat= "server"> </asp:View>
</asp:MultiView>
Properties of View and MultiView Controls
Both View and MultiView controls are derived from Control class and inherit all its properties, methods, and events. The most important property of the View control is Visible property of type Boolean, which sets the visibility of a view.
The MultiView control has the following important properties:
| Properties | Description |
|---|---|
| Views | Collection of View controls within the MultiView. |
| ActiveViewIndex | A zero based index that denotes the active view. If no view is active, then the index is -1. |
The CommandName attribute of the button control associated with the navigation of the MultiView control are associated with some related field of the MultiView control.
For example, if a button control with CommandName value as NextView is associated with the navigation of the multiview, it automatically navigates to the next view when the button is clicked.
The following table shows the default command names of the above properties:
| Properties | Description |
|---|---|
| NextViewCommandName | NextView |
| PreviousViewCommandName | PrevView |
| SwitchViewByIDCommandName | SwitchViewByID |
| SwitchViewByIndexCommandName | SwitchViewByIndex |
The important methods of the multiview control are:
| Methods | Description |
|---|---|
| SetActiveview | Sets the active view |
| GetActiveview | Retrieves the active view |
Every time a view is changed, the page is posted back to the server and a number of events are raised. Some important events are:
| Events | Description |
|---|---|
| ActiveViewChanged | Raised when a view is changed |
| Activate | Raised by the active view |
| Deactivate | Raised by the inactive view |
Apart from the above mentioned properties, methods and events, multiview control inherits the members of the control and object class.
Example
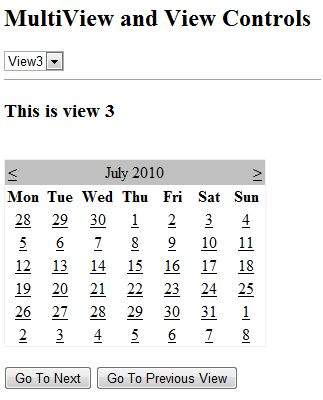
The example page has three views. Each view has two button for navigating through the views.
The content file code is as follows:
<%@ Page Language="C#" AutoEventWireup="true" CodeBehind="Default.aspx.cs" Inherits="multiviewdemo._Default" %>

<!DOCTYPE html PUBLIC "-//W3C//DTD XHTML 1.0 Transitional//EN" "http://www.w3.org/TR/xhtml1/DTD/xhtml1-transitional.dtd">

<html xmlns="http://www.w3.org/1999/xhtml" >

   <head runat="server">
      <title>
         Untitled Page
      </title>
   </head>

   <body>
      <form id="form1" runat="server">

         <div>
            <h2>MultiView and View Controls</h2>

            <asp:DropDownList ID="DropDownList1" runat="server" onselectedindexchanged="DropDownList1_SelectedIndexChanged">
            </asp:DropDownList>

            <hr />

            <asp:MultiView ID="MultiView1" runat="server" ActiveViewIndex="2"  onactiveviewchanged="MultiView1_ActiveViewChanged" >
               <asp:View ID="View1" runat="server">
                  <h3>This is view 1</h3>
                  <br />
                  <asp:Button CommandName="NextView" ID="btnnext1" runat="server" Text = "Go To Next" />
                  <asp:Button CommandArgument="View3" CommandName="SwitchViewByID" ID="btnlast" runat="server" Text  ="Go To Last" />
               </asp:View>

               <asp:View ID="View2" runat="server">
                  <h3>This is view 2</h3>
                  <asp:Button CommandName="NextView" ID="btnnext2" runat="server" Text = "Go To Next" />
                  <asp:Button CommandName="PrevView" ID="btnprevious2" runat="server" Text = "Go To Previous View" />
               </asp:View>

               <asp:View ID="View3" runat="server">
                  <h3> This is view 3</h3>
                  <br />
                  <asp:Calendar ID="Calender1" runat="server"></asp:Calendar>
                  <br />
                  <asp:Button  CommandArgument="0" CommandName="SwitchViewByIndex" ID="btnfirst"   runat="server" Text = "Go To Next" />
                  <asp:Button CommandName="PrevView" ID="btnprevious" runat="server" Text = "Go To Previous View" />
               </asp:View>

            </asp:MultiView>
         </div>

      </form>
   </body>
</html>
Observe the following:
The MultiView.ActiveViewIndex determines which view will be shown. This is the only view rendered on the page. The default value for the ActiveViewIndex is -1, when no view is shown. Since the ActiveViewIndex is defined as 2 in the example, it shows the third view, when executed.
Configuration
The behavior of an ASP.NET application is affected by different settings in the configuration files:
- machine.config
- web.config
The machine.config file contains default and the machine-specific value for all supported settings. The machine settings are controlled by the system administrator and applications are generally not given access to this file.
An application however, can override the default values by creating web.config files in its roots folder. The web.config file is a subset of the machine.config file.
If the application contains child directories, it can define a web.config file for each folder. Scope of each configuration file is determined in a hierarchical top-down manner.
Any web.config file can locally extend, restrict, or override any settings defined on the upper level.
Visual Studio generates a default web.config file for each project. An application can execute without a web.config file, however, you cannot debug an application without a web.config file.
The following figure shows the Solution Explorer for the sample example used in the web services tutorial:
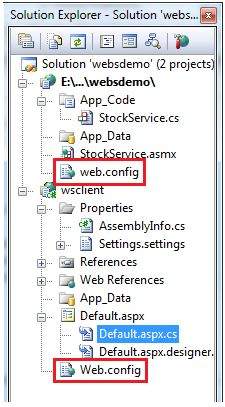
In this application, there are two web.config files for two projects i.e., the web service and the web site calling the web service.
The web.config file has the configuration element as the root node. Information inside this element is grouped into two main areas: the configuration section-handler declaration area, and the configuration section settings area.
The following code snippet shows the basic syntax of a configuration file:
<configuration>

   <!-- Configuration section-handler declaration area. -->
      <configSections>
         <section name="section1" type="section1Handler" />
         <section name="section2" type="section2Handler" />
      </configSections>
   <!-- Configuration section settings area. -->

   <section1>
      <s1Setting1 attribute1="attr1" />
   </section1>

   <section2>
      <s2Setting1 attribute1="attr1" />
   </section2>

   <system.web>
      <authentication mode="Windows" />
   </system.web>

</configuration>
Configuration Section Handler declarations
The configuration section handlers are contained within the <configSections> tags. Each configuration handler specifies name of a configuration section, contained within the file, which provides some configuration data. It has the following basic syntax:
<configSections>
   <section />
   <sectionGroup />
   <remove />
   <clear/>
</configSections>
It has the following elements:
-
Clear - It removes all references to inherited sections and section groups.
-
Remove - It removes a reference to an inherited section and section group.
-
Section - It defines an association between a configuration section handler and a configuration element.
-
Section group - It defines an association between a configuration section handler and a configuration section.
Application Settings
The application settings allow storing application-wide name-value pairs for read-only access. For example, you can define a custom application setting as:
<configuration>
   <appSettings>
      <add key="Application Name" value="MyApplication" />
   </appSettings>
</configuration>
For example, you can also store the name of a book and its ISBN number:
<configuration>
   <appSettings>
      <add key="appISBN" value="0-273-68726-3" />
      <add key="appBook" value="Corporate Finance" />
   </appSettings>
</configuration>
Connection Strings
The connection strings show which database connection strings are available to the website. For example:
<connectionStrings>
   <add name="ASPDotNetStepByStepConnectionString"
      connectionString="Provider=Microsoft.Jet.OLEDB.4.0;
      Data Source=E:\\projects\datacaching\ /
      datacaching\App_Data\ASPDotNetStepByStep.mdb"
      providerName="System.Data.OleDb" />

   <add name="booksConnectionString"
      connectionString="Provider=Microsoft.Jet.OLEDB.4.0;
      Data Source=C:\ \databinding\App_Data\books.mdb"
      providerName="System.Data.OleDb" />
</connectionStrings>
System.Web Element
The system.web element specifies the root element for the ASP.NET configuration section and contains configuration elements that configure ASP.NET Web applications and control how the applications behave.
It holds most of the configuration elements needed to be adjusted in common applications. The basic syntax for the element is as given:
<system.web>
   <anonymousIdentification>
   <authentication>
   <authorization>
   <browserCaps>
   <caching>
   <clientTarget>
   <compilation>
   <customErrors>
   <deployment>
   <deviceFilters>
   <globalization>
   <healthMonitoring>
   <hostingEnvironment>
   <httpCookies>
   <httpHandlers>
   <httpModules>
   <httpRuntime>
   <identity>
   <machineKey>
   <membership>
   <mobileControls>
   <pages>
   <processModel>
   <profile>
   <roleManager>
   <securityPolicy>
   <sessionPageState>
   <sessionState>
   <siteMap>
   <trace>
   <trust>
   <urlMappings>
   <webControls>
   <webParts>
   <webServices>
   <xhtmlConformance>
</system.web>
The following table provides brief description of some of common sub elements of the system.web element:
AnonymousIdentification
This is required to identify users who are not authenticated when authorization is required.
Authentication
It configures the authentication support. The basic syntax is as given:
<authentication mode="[Windows|Forms|Passport|None]">
   <forms>...</forms>
   <passport/>
</authentication>
Authorization
It configures the authorization support. The basic syntax is as given:
<authorization>
   <allow .../>
   <deny .../>
</authorization>
Caching
It Configures the cache settings. The basic syntax is as given:
<caching>
   <cache>...</cache>
   <outputCache>...</outputCache>
   <outputCacheSettings>...</outputCacheSettings>
   <sqlCacheDependency>...</sqlCacheDependency>
</caching>
CustomErrors
It defines custom error messages. The basic syntax is as given:
<customErrors defaultRedirect="url" mode="On|Off|RemoteOnly">
   <error. . ./>
</customErrors>
Deployment
It defines configuration settings used for deployment. The basic syntax is as follows:
<deployment retail="true|false" />
HostingEnvironment
It defines configuration settings for hosting environment. The basic syntax is as follows:
<hostingEnvironment idleTimeout="HH:MM:SS" shadowCopyBinAssemblies="true|false"
   shutdownTimeout="number" urlMetadataSlidingExpiration="HH:MM:SS" />
Identity
It configures the identity of the application. The basic syntax is as given:
<identity impersonate="true|false" userName="domain\username"
   password="<secure password>"/>
MachineKey
It configures keys to use for encryption and decryption of Forms authentication cookie data.
It also allows configuring a validation key that performs message authentication checks on view-state data and forms authentication tickets. The basic syntax is:
<machineKey validationKey="AutoGenerate,IsolateApps" [String]
   decryptionKey="AutoGenerate,IsolateApps" [String]
   validation="HMACSHA256" [SHA1 | MD5 | 3DES | AES | HMACSHA256 |
   HMACSHA384 | HMACSHA512 | alg:algorithm_name]
   decryption="Auto" [Auto | DES | 3DES | AES | alg:algorithm_name]
/>
Membership
This configures parameters of managing and authenticating user accounts. The basic syntax is:
<membership defaultProvider="provider name"
   userIsOnlineTimeWindow="number of minutes" hashAlgorithmType="SHA1">
   <providers>...</providers>
</membership>
Pages
It provides page-specific configurations. The basic syntax is:
<pages asyncTimeout="number" autoEventWireup="[True|False]"
      buffer="[True|False]" clientIDMode="[AutoID|Predictable|Static]"
      compilationMode="[Always|Auto|Never]"
      controlRenderingCompatibilityVersion="[3.5|4.0]"
      enableEventValidation="[True|False]"
      enableSessionState="[True|False|ReadOnly]"
      enableViewState="[True|False]"
      enableViewStateMac="[True|False]"
      maintainScrollPositionOnPostBack="[True|False]"
      masterPageFile="file path"
      maxPageStateFieldLength="number"
      pageBaseType="typename, assembly"
      pageParserFilterType="string"
      smartNavigation="[True|False]"
      styleSheetTheme="string"
      theme="string"
      userControlBaseType="typename"
      validateRequest="[True|False]"
      viewStateEncryptionMode="[Always|Auto|Never]" >

   <controls>...</controls>
   <namespaces>...</namespaces>
   <tagMapping>...</tagMapping>
   <ignoreDeviceFilters>...</ignoreDeviceFilters>
</pages>
Profile
It configures user profile parameters. The basic syntax is:
<profile enabled="true|false" inherits="fully qualified type reference"
   automaticSaveEnabled="true|false" defaultProvider="provider name">

   <properties>...</properties>
   <providers>...</providers>

</profile>
RoleManager
It configures settings for user roles. The basic syntax is:
<roleManager cacheRolesInCookie="true|false" cookieName="name"
   cookiePath="/" cookieProtection="All|Encryption|Validation|None"
   cookieRequireSSL="true|false " cookieSlidingExpiration="true|false "
   cookieTimeout="number of minutes" createPersistentCookie="true|false"
   defaultProvider="provider name" domain="cookie domain">
   enabled="true|false"
   maxCachedResults="maximum number of role names cached"

   <providers>...</providers>
</roleManager>
SecurityPolicy
It configures the security policy. The basic syntax is:
<securityPolicy>
   <trustLevel />
</securityPolicy>
UrlMappings
It defines mappings to hide the original URL and provide a more user friendly URL. The basic syntax is:
<urlMappings enabled="true|false">
   <add.../>
   <clear />
   <remove.../>
</urlMappings>
WebControls
It provides the name of shared location for client scripts. The basic syntax is:
<webControls clientScriptsLocation="String" />
WebServices
This configures the web services.
Deployment
There are two categories of ASP.NET deployment:
-
Local deployment : In this case, the entire application is contained within a virtual directory and all the contents and assemblies are contained within it and available to the application.
-
Global deployment : In this case, assemblies are available to every application running on the server.
There are different techniques used for deployment, however, we will discuss the following most common and easiest ways of deployment:
- XCOPY deployment
- Copying a Website
- Creating a set up project
XCOPY Deployment
XCOPY deployment means making recursive copies of all the files to the target folder on the target machine. You can use any of the commonly used techniques:
- FTP transfer
- Using Server management tools that provide replication on a remote site
- MSI installer application
XCOPY deployment simply copies the application file to the production server and sets a virtual directory there. You need to set a virtual directory using the Internet Information Manager Microsoft Management Console (MMC snap-in).
Copying a Website
The Copy Web Site option is available in Visual Studio. It is available from the Website -> Copy Web Site menu option. This menu item allows copying the current web site to another local or remote location. It is a sort of integrated FTP tool.
Using this option, you connect to the target destination, select the desired copy mode:
- Overwrite
- Source to Target Files
- Sync UP Source And Target Projects
Then proceed with copying the files physically. Unlike the XCOPY deployment, this process of deployment is done from Visual Studio environment. However, there are following problems with both the above deployment methods:
- You pass on your source code.
- There is no pre-compilation and related error checking for the files.
- The initial page load will be slow.
Creating a Setup Project
In this method, you use Windows Installer and package your web applications so it is ready to deploy on the production server. Visual Studio allows you to build deployment packages. Let us test this on one of our existing project, say the data binding project.
Open the project and take the following steps:
Step (1) : Select File -> Add -> New Project with the website root directory highlighted in the Solution Explorer.
Step (2) : Select Setup and Deployment, under Other Project Types. Select Setup Wizard.
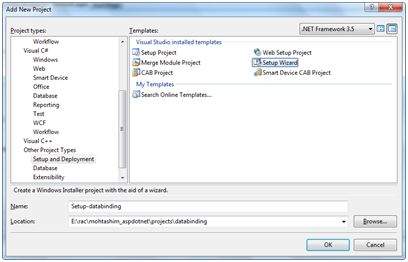
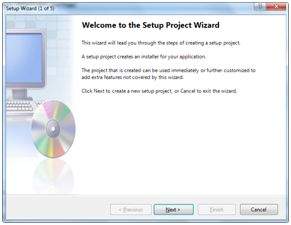
Step (3) : Choosing the default location ensures that the set up project will be located in its own folder under the root directory of the site. Click on okay to get the first splash screen of the wizard.
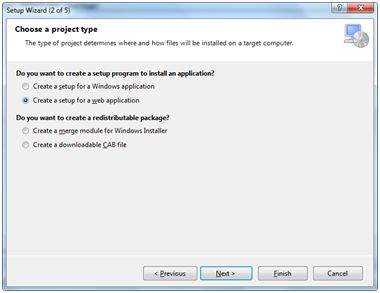
Step (4) : Choose a project type. Select 'Create a setup for a web application'.
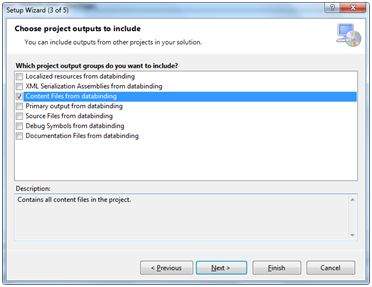
Step (5) : Next, the third screen asks to choose project outputs from all the projects in the solution. Check the check box next to 'Content Files from...'
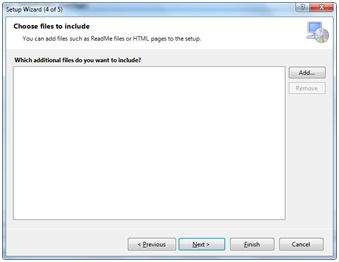
Step (6) : The fourth screen allows including other files like ReadMe. However, in our case there is no such file. Click on finish.
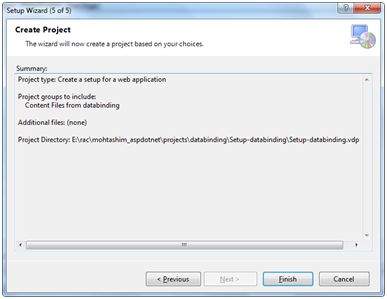
Step (7) : The final screen displays a summary of settings for the set up project.
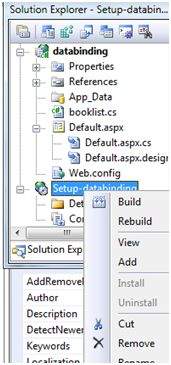
Step (8) : The Set up project is added to the Solution Explorer and the main design window shows a file system editor.

Step (9) : Next step is to build the setup project. Right click on the project name in the Solution Explorer and select Build.
Step (10) : When build is completed, you get the following message in the Output window:

Two files are created by the build process:
- Setup.exe
- Setup-databinding.msi
You need to copy these files to the server. Double-click the setup file to install the content of the .msi file on the local machine.
0 Comments: